 |
|
 Son of FrankenMac (G4 to 20 Drive Server Cube Case Conversion) By Doug B. Published: 10/15/2004 (Last revised: 12/22/2006 - notes/pix on latest mods) |
|
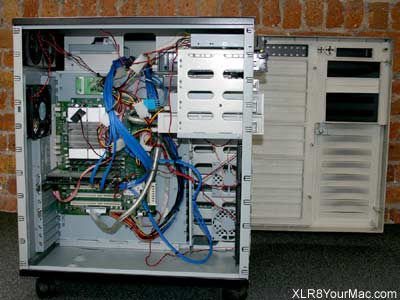
(In December 2006 Doug sent an update on new mods) Starting out I had in the case, the mother board, a number of fans, the startup drive, optical drive, and four drives set up as a RAID. later I added two more in Raid configuration... We again started to run out of storage, so it became time to upgrade. I decided to go with different RAID cards. While Highpoint's 1820A works great on the Mac, SMART status was not available, so I bought two of Highpoints RocketRAID 2220 cards. One problem and I think it's sort of a pain, is that some of your RAIDs may not survive the upgrade of the card, so have a backup of the RAIDs. Other then that the cards work great in the Mac. I then added my additional drives, I'm at 13 now, plus the optical drive. After getting everything connected up for the first time, I turned on the power, the computer started to come on, but a second later turned off... after a little detective work, and this is something I was afraid of, I found the stock power supply was not enough... After looking around on xlr8yourmac, I decided to try making a wire harness to convert a stock ATX power supply into a mac supply. I have done this with a "Yikes" model successfully, this was a quicksilver though and I knew I was missing the 24v+, but I thought the mac might just pass that on... long story short it didn't and would not boot...
The solution I came up with was to keep the mother board powered by the
stock power supply and using the 600 watt supply to power everything
else. After searching around online, I found the following link on how
to convert the ATX power supply into a Lab power supply and keep it on
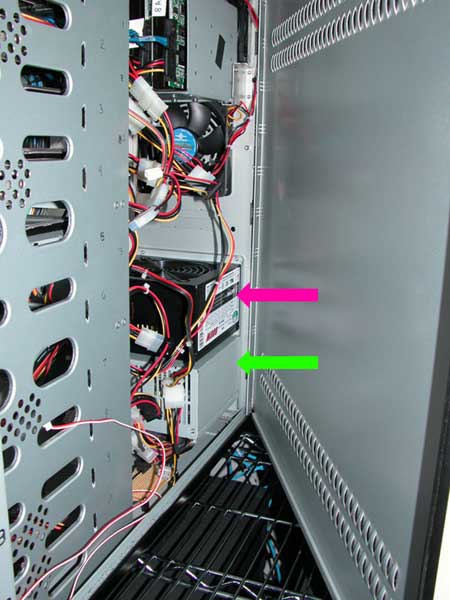
without a computer... My goal was to be able to push the power button on the front of the computer and have everything start up normal... like a Mac, so I needed one power supply to turn on the other... how? With a little Relay. I found one from Radio Shack that was a 10-volt model that trips immediately, that way after the mother board does its self tests, the drives are powered up and ready to boot the server.
We now have a case that can hold and power at least 20 drives, a
success!
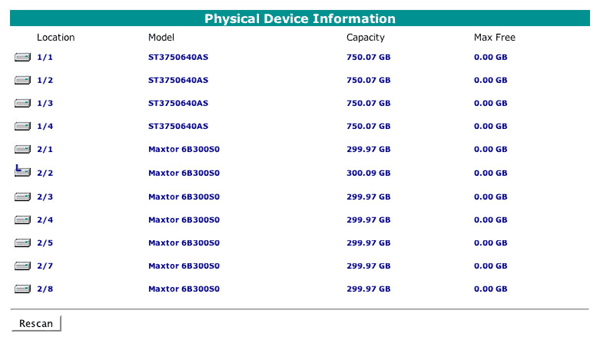
 Here's a screen capture of the web interface showing the SATA drives:
 If have any questions, let me know, but I thought this would make a nice follow up to the original project.
(The original article from Oct. 2004 follows)
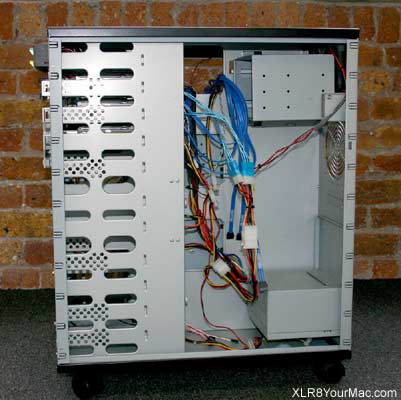
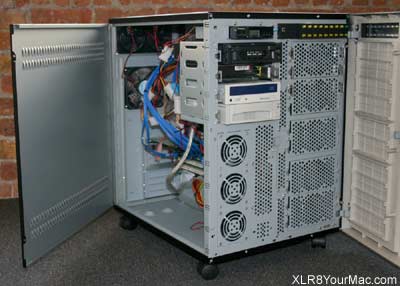
One of my goals during the process was to upgrade my current machine, a G4 867mhz Quicksilver, to a new G5. And after doing a cost analysis I found that again building a server would still be cheaper than compared to other servers including the xServe. I first started looking for cases. I knew I wanted at least 14 bays, if not bigger. After a great deal of searching I decided on a case from caseoutlet.com. They had a 20 drive case that seemed like it would work great.
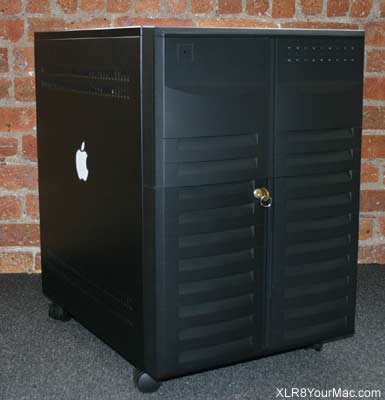 Case w/Apple logo added
 The next problem was controlling all those drives. If I were to go the IDE 133 route, I could have added up to four cards (16 drives) plus the two internal IDE channels would have given me 4 more drives totaling 20 drives. But I was hoping for faster/newer components, and decided to look into SATA. I looked to Sonnet as they had served me well in the past, but their only SATA product has two connectors (hopefully they will come out with a 4 channel card in the future), which would max the server at 8 drives (plus 4 drives max on the built in IDE channels). While 12 drives was okay, my goal was to be able to fill the case. After further searching I came across 3ware's Escalade 9500 8 Port Serial ATA RAID Controller card. That's right 8 channels two cards and one 2 channel from sonnet would put me at may goal, but... they currently don't support the mac, although, I think they might in the future. So my searched continued until one afternoon while checking the headlines at macsurfer.com, I read about a 1200mb files transfer speeds in a G5/G4. Intrigued I checked out the story and there I found my answer. The new RocketRAID 1820A from HighPoint Technologies. In the last month they added support for G4/G5 computers running 10.2+. I immediately searched them out on the web, and fired off a few questions. After getting the answers I was looking for it seemed like most of the key pieces were in place. I presented my information to the powers that be, and after a short time, received an okay. I first ordered my new Dual 2GHz G5, what a dream, and then placed my order for the case, the card, cables, and a couple of drives. As luck would have it this summer, one of the drives on our older servers died, and all we had was the tape backup. Even now I'm not sure all the information was able to be recovered unfortunately as not all of it had been backed up. When I had built those servers, non of the drives were configured as a RAID. I was trying to not spend a lot of money, but after having a drive die, I knew this new server had to be better prepared. So before I was finished installing everything, I had ordered 2 more drives for RAID purposes. The first step after getting all the parts was removing the G4's components, out came the power supply, the drives, the video card, memory and finally the motherboard. The hardest part of the build up was mounting the mother board. As with me previous to buildups, I needed to drill holes where the mac board mounted, and use risers to offset the board from the base. I did find one hole that matched up from a standard ATX board, see Macs and PCs aren't that different :-).
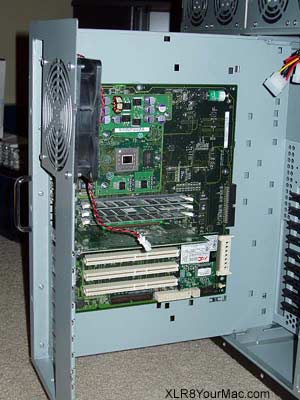
 I then had to work on the next major task, the power supply. Unfortunately the new G4s don't use a standard power supply connector (i.e. you can't just plug in a std ATX supply, see this page for a summary, also the QuickSilver models have a 4pin aux connector and beefier 12v rating than previous models. Also gigabit and later models have 28VDC used for ADC display power. Beige G3 MT models used an ATX supply and B&W G3/Yikes G4/PCI models and sawtooth G4/AGP models needed only minor mods as mentioned in past case conversion articles on the systems page-Mike), so after much debating I decided to lengthen the wires on the existing supply. I had to add 24" extra to each wire in the motherboard power supply. A word of caution if you ever set out to do something similar, either mark off which wires are what, or only work on one at a time, as mixing them up will have disastrous results. I choose to go the one at a time route, and 4 hours later had an extra 24" on my power supply.
 I mounted the primary startup drive, and the optical drive, connected them up, installed my power supply, and fired up the computer. Same old grey apple, but in a much bigger case.

 I wiped the startup drive, and installed a fresh copy of panther. I then installed the Highpoint Card, and connected up 2 hard drives. After installing the software, I had to download it, as the Mac support was very new. I rebooted, and when the finder appeared, I got the message that two drives needed to be formated. I formated the two as separate drives at first and did a few network tests. Since our servers are used to archive, one of my primary concerns is write speed, so I copied 1.24 gigs of files from a G5 on our network to the drive, and it took 2 min and 4 sec, during several attempts. Not bad, but not blazingly fast either. So next I fired up disk utility and reformatted the two as a Striped Array. This time, I thought I should see some really impressive results, so I started my copy, and it only took 2 min and 4... hey wait a second. The time should have decreased right? We have a 10/100Mb switch at our office, and as I found out, I was pretty much maxing it out. When you calculate out those transfer rates you get about 80MB/sec. I would like to see more from our network, but after several more tests, that was the best I got. I then added the remaining two drives and and again configured a Striped RAID (over 4 drives), this time through RAIDman, highpoints configuration software for the card. After connecting the server to the G5 directly (The quicksilver and the G5 both have a 1000Mb ethernet ports, another reason for wanting to use a quicksilver) I again repeated the test, this time the test folder was slightly larger though at 1.25 gigs. The results this time were much more impressive, the transfer took 30 seconds (repeated twice). I then tried duplicating the folder on the drive and found it took 15 seconds to duplicate the entire 1.25 gig folder, which for those of you keeping score at home comes out to 666 mb/sec. Much better... But like I said, my goal was speed, but also data security, so I fired up RAIDman once more, and and this time created a RAID 10 volume which is both stripped and mirrored. This sort of drive can survive the loss of one of the drives, and still maintain data integrity, although at a crippled state. If a drive does fail, a new drive is swapped in and RAIDman will rebuild the RAID, much better then trying to retrieve about 600 gigs off our tape backup. So how much speed did I loose after switching to the RAID 10 setup? The same 1.25 gig folder took 40 seconds to copy, only ten seconds more. And the duplicate folder test took 20 seconds, I can live with those numbers, especially when our network, for the time being will be the bottleneck.
Overall the Physical buildup of the server took just over 24 man hours.
The RAID set up was fast, about an hour, although the testing took some
time. I have since configured the shares on the server, and set up our
normal groups and users. I look forward to many days with little
trouble as our new server does it's new job. Results - 200.00 System Info Xbench Version - 1.1.3 System Version - 10.3.5 (7M34) Physical RAM - 1536 MB Model - PowerMac3,5 Processor - PowerPC G4 @ 867 MHz Version - 7450 (V'ger) v2.1 L1 Cache - 32K (instruction), 32K (data) L2 Cache - 256K @ 867 MHz L3 Cache - 2048K @ 217 MHz Bus Frequency - 134 MHz Video Card - GeForce2 MX Drive Type - RR182x RAID 1/0 Array Disk Test - 200.00 Sequential - 181.73 Uncached Write - 165.4968.98 MB/sec [4K blocks] Uncached Write - 176.8772.43 MB/sec [256K blocks] Uncached Read - 143.7522.76 MB/sec [4K blocks] Uncached Read - 297.86120.35 MB/sec [256K blocks] Random - 222.35 Uncached Write - 660.249.90 MB/sec [4K blocks] Uncached Write - 277.1462.50 MB/sec [256K blocks] Uncached Read - 177.721.17 MB/sec [4K blocks] Uncached Read - 138.1228.42 MB/sec [256K blocks]
| |
|
For other Mac Mods and Case Conversion Articles, see the Systems related articles page |
|
All brand or product names mentioned are properties of their respective companies. Legal:Site Privacy and terms/conditions of use. |