Apple TV Hard Drive Upgrade Guide - A Better Way (IMHO)
(Updated Jan. 12, 2018 for later ATV cloner link)
FYI: Of course it goes without saying that this mod voids any warranty you may have on the Apple TV. Personally my Apple TV was several years old and long past any warranty coverage. I've seen no issues with this 320GB HD Upgrade on my Apple TV (with firmware 3.0.2 - the latest as of this article's original post date) and several readers have used my guide w/o any problems - but as with any mod, YMMV.
As I mentioned earlier in 2010 (in news page and Gen 1 Apple TV feedback/tips/mods page), after years of putting it off (always something more pressing) I finally made time to upgrade the hard drive in an early model 40GB Apple TV with a 320GB WD Scorpio Blue. And thanks to a reader (Mike M.) that sent photos of the bottom plate sans rubber cover, I did something that I'd always thought was a better way than ripping off the bottom rubber cover. (Which often results in tearing it.) I cut away the rubber around the screws on the bottom plate instead of ripping the entire cover off. Having the screw heads exposed makes the take-apart much simpler/faster. (And with the screw heads exposed, future take-aparts for other mods (or repairs) is a snap.)
I created the image below in photoshop from a photo of my Apple TV (after holes were cut) and added dimensions to the screw hole locations. I used English (inch/fractions) rather than decimals since I suspect most owners are more likely to have a ruler handy than a set of calipers. It's possible there's some variation in locations due to mfg tolerances, some (very slight) slop in mtg holes/plate position, etc. but the dimensions below should get you more than close enough to trim away the rubber over the screws using an Xacto knife (or similar). Unfortunately I couldn't find my Xacto knife (with a nice sharp/tapered edge) and used an old razor knife (with snap-off tips) that had been broken square instead of on an angle, so my cuts were not "pretty". But since the bottom area is never seen in use it's no big deal. (I could have used adhesive felt dots, etc. to cover the holes but why bother.)
(If I really wanted nearly perfect cuts I'd have dug harder to find an old Leather hole punch I had from years ago with a rotating wheel of various hole sizes. Using that (perhaps even heated) with the proper size hole punch (appx 1/4in dia screw heads) could have made nearly perfect cutouts perhaps - but again it's really not a big deal anyway.
Screw Hole Locations (for cutouts vs ripping off bottom cover)
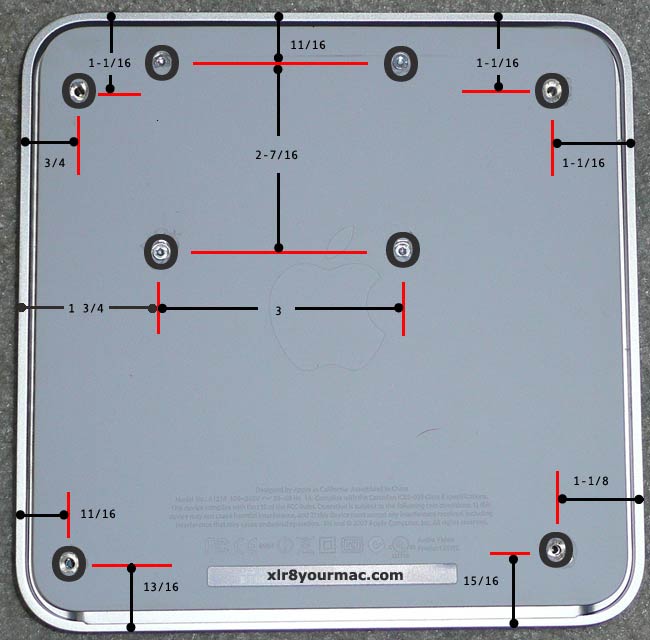
(Ports End of Apple TV)
Use the above pix as a guide to locate the screws using a ruler and mark (+) the locations with a pen or pencil. (You can wipe the marks off later.) Using an Xacto knife (preferably) cut through the rubber cover (it's not very thick over the screws) - and with a sharp knife, you can literally use the edges of the screw to guide a circular cutout around the screw heads if you're careful. The screw head diameter is appx 1/4in, I just used the border of the screw head as a 'guide' for my knife (blade against the edge of the screw head) as I cut around them. (Again how "pretty" the cutout is really doesn't matter since its hidden in use.)
Once you have the screws exposed, it's simply a matter of removing the Torx screws. On my early 40GB ATV, the outer 4 screws are T10, the inner 4 used to secure the hard drive are T9. One reader says his 40GB ATV has T8 HD screws, but I TRIPLE checked mine again - a T9 fits the HD screws without any slop. (I can remove the screws with the next size down, but the sizes I mention are the best fit for my sample anyway. I'm using a Kobalt 8-in-1 Precision Torx Head Screwdriver I bought from Lowes last fall.)
Remove the outer 4 screws first, which will allow the bottom plate to be removed while still having the hard drive retained to the bottom plate. (Note: The 2 screws on the Ports end are fully threaded, unlike the pair on the opposite end - you can see why in the photo below which shows the difference in standoff lengths the screws pass through.)
When removing the bottom plate, take care to not overly stress the hard drive's ribbon cable from the motherboard. The motherboard is secured to the top surface and a folded IDE (PATA) ribbon cable runs from it to the hard drive mounted on the bottom plate as shown in the photo below:
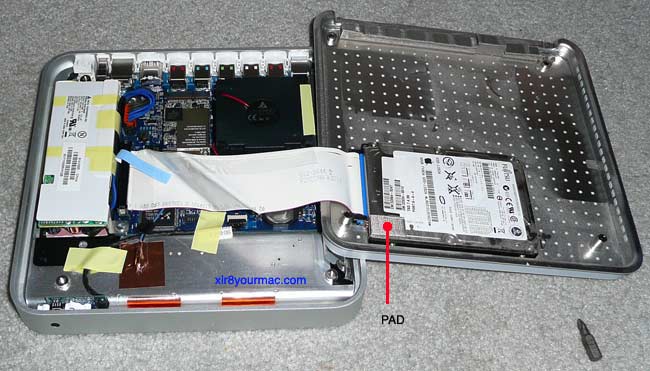
Notice the (adhesive backed) gray pad attached to the corner of the OEM hard drive's top cover. (You'll remove this to transfer to the new HD, although I forgot to do that initially, I did later. Another reason why the exposed screws are a plus - no ripping off/regluing the cover.)
Once you have the covers apart, remove the 4 screws securing the OEM hard drive to the bottom plate. (I found it easier to remove the IDE cable after removing the screws.) The photo below shows me holding the OEM 40GB (Fujitsu btw) and you can see the rubber sheet attached to the bottom of it (insulator sheet between the HD and the bottom metal cover). You'll remove this sheet (and the foam pad on the top corner of the HD) for transferring to the new drive.
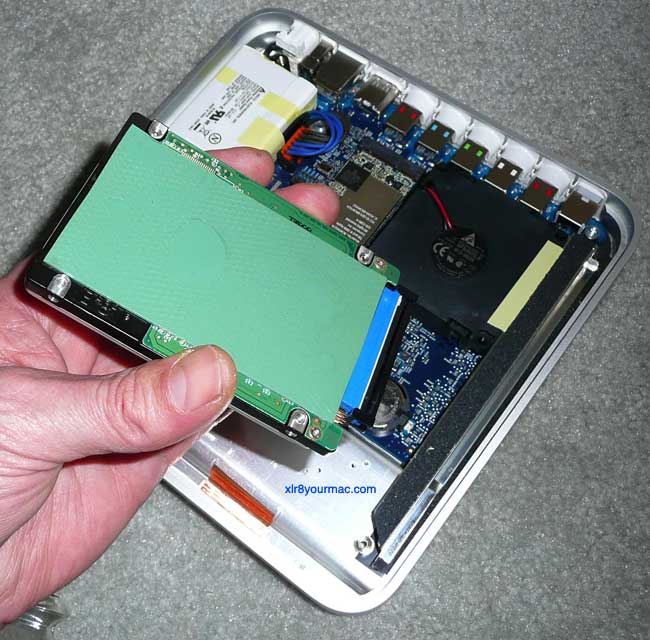
In the above photo you can see the CPU fan and to the left of it, the wireless (mini-PCIe) card. (One of the future mods (for 1080P content playback) I may consider is replacing the wireless card with a Crystal video card and using XMBC with drivers for it.)
This photo shows peeling off the green (rubber) insulation sheet from the OEM hard drive to apply it to the new drive.
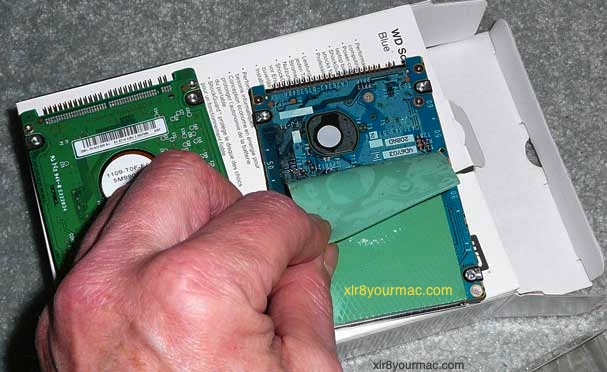
Removing the OEM Insulating Sheet to Place on the new Hard Drive
Cloning the OEM Hard Drive: (AtvCloner source updated January 12th, 2018.)
And as other readers have noted before, a big thanks to Dynaflash for their freeware ATVcloner app (see note below) that eliminates the need to use terminal commands (that were shown in HD upgrade guides I linked to years ago here).
The download link for AtvCloner App I originally used in 2010 went MIA. In 2012 a reader (James S.) then sent his Snow Leopard and Leopard version dropbox links in 2012 here for those needing it. On January 11th, 2018 I received this mail with another source. (I used the original source, but no longer have it. I've not used the app from any other source since then.)
"AtvCloner.app for the hard drive on the 1st Gen Apple TV available
Date: 01/11/2018 11:26PM
I am the author of the old AtvCloner.app. I didn't realize you had written an article about it years ago. I have seen some increasing interest (for some insane reason) in old ATV Gen 1's. Frankly I kinda forgot about AtvCloner being out in the wild but was alerted to broken links on old articles for modifying the Apple TV Gen 1 by some other devs.
Users could stll get it from my github page https://github.com/dynaflash/AtvCloner/blob/master/AtvCloner.app.zip if they want. I am still using it periodically on macos 10.13 so it seems to still work just fine.
Regards, Joe"
IIRC, later iTunes versions don't support the Apple TV Gen 1. (iTunes 11 and later? Can't recall now, but have seen some reports in Apple's forums over the years from Apple TV Gen 1 users with later iTunes versions.)
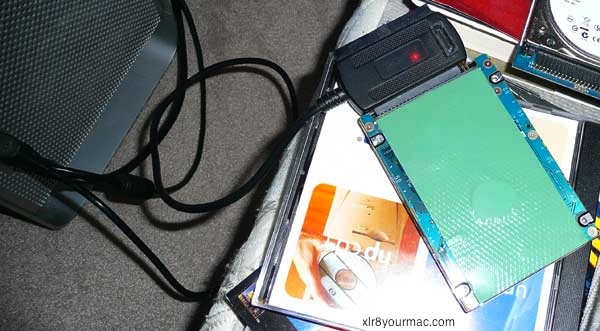
Since the Apple TV uses PATA (not SATA) drives, I used a NewerTech USB universal drive adapter that I've had for years to mount the OEM drive in OS X. ATVcloner made cloning the OEM partitions and prepping the new 320GB WD Scorpio PATA drive a breeze. (I used OS X 10.5.8 and the Leopard version of ATVcloner.) The photo below is of the OEM drive connected to my Mac Pro USB port using the NewerTech Universal Drive Adapter. (After imaging the original drive I used the same adapter for prepping the new drive.)
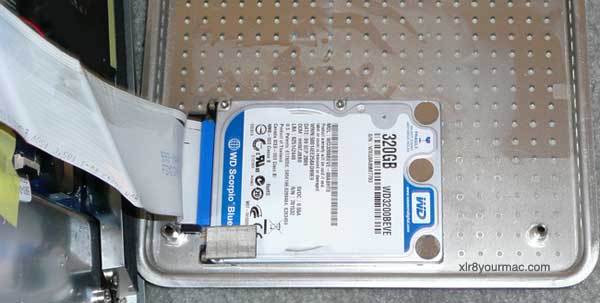
Once you've cloned the partitions to the new drive. It's simply a matter of attaching the insulation sheet to the bottom of the new drive and the pad to the top corner of it. Then connect the IDE cable and attach the new drive to the bottom plate using the 4 screws removed earlier.
Now just mate the bottom cover and secure it using the 4 screws.
BTW: I did not wipe/restore the OEM HD before doing this as it's not necessary. On first use with the new drive installed (be patient on first power-up), you're prompted to go through the initial setup again. (Including iTunes code entry, etc.) And for those like me with over 200GB of media to sync to the new drive, I'd suggest an ethernet connection rather than wireless. Although the Apple TV's ethernet port is only 100 Mbit max, Ethernet is more efficient than the built-in wireless, but it's still going to take awhile. (With my 5GHz/wide/300 Mbit link it took about 24 hours to sync 293GB of content. I literally filled the drive initially to where I had "zero bytes" free, but later deleted some content to free up a couple GB.)
Hopefully the above is useful for anyone else that has wanted to upgrade their first generation Apple TV hard drive but kept putting it off.
-Mike
|